The KLR 650 has a reputation for adventure riding, especially providing credibility & withstanding the model’s long history of convenient, dependable & adventure bikes. This article, it will be further explained on how to change the tire on a KLR 650. And the factors that should be considered in terms of size, pressure & the necessary tools needed for it.
Furthermore, it has been mentioned below on the steps or processes that should be followed when replacing the tires & you also can refer the complete video that clearly states on how the tires should be replaced of KLR 650.
Preparation before replacing KLR 650 tires
The following are some of the tools that you need to replace the tires irrespective of front or rear:
- Valve core extraction tool
- Two tusk tire levers
- One larger curved lever
- 12-millimeter crescent wrench
- Pliers
Tire Size & Pressure
- Front tire – 90/90-21, 21 PSI
- Rear tire – 130/80 – 17, 28 PSI
Read More About KLR 650 Tires Size.
Process of replacing the tires in KLR 650
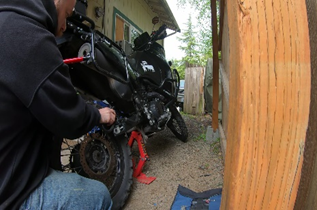
The first step is the process of removing the rear tire. You should allow it to rest on the kickstand & use a jack stand to increase leverage. It is also important to remove the cotter pin from the axle that leads to the castle nut and avoid backing out on its own. Moreover, it is also important to keep track of your things e.g.: nuts, pieces, washers.
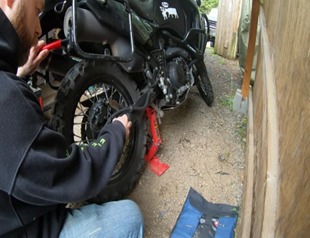
The second step is to remove the axle, especially when removing it because it is advisable to put your leg underneath the tire in order to increase leverage and can slowly remove the tire.
On the new tire, you must break the bead by separating the wheel and the tire. You can push it or use a large clamp & a curved tire iron. Lubrication is important to make the process easier. Followingly, it is better to pull the tire as high up the rim as you can to get the spoon down.
The next step is where on the valve stem of the tube, you’ll want to remove the valve stem cap and the first nut by tightening the second nut. You have to fix the tire on the wheel by slowly inserting it, especially during the installation process. Afterward, it is possible to insert the tube inside the tire.

Next, it’s about placing the brake calipers on the edge, so it doesn’t affect when placing the rear wheel. Hence, it is advisable to adjust it by using your foot to give leverage. Once the tire is placed, you can install the washer & castle nut. Finally, it is important to include the cotter pin, so it doesn’t fall out.
How to replace the front tire of KLR 650
Firstly, it is important to get the motorcycle in a suitable position through a center stand. Also, it is important to jack lift the motorcycle to easily remove the tire.
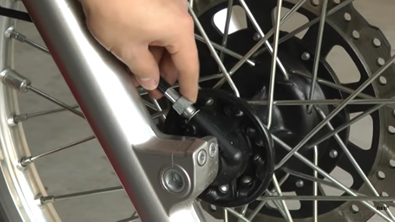
The second step is removing the speedometer cable & then removing the axle nut through-axle bolts by a wrench. It requires more effort to remove the axle bolts.
The next step is to hammer on the outside of the front axle and then to remove it by adjusting the front tire.
On the new tire, you need to get the valve cap & reposition the valve core.

Now it’s time to remove the bead. On the new tire, you must break the bead by separating the wheel and the tire. You can push it or use a large clamp & a curved tire iron. Lubrication is important to make the process easier. Followingly, it is better to pull the tire as high up the rim as you can to get the spoon down.
The next step is where on the valve stem of the tube, you’ll want to remove the valve stem cap and the first nut by tightening. You must fix the tire on the wheel by slowly inserting it, especially during the installation process. Afterward, it is possible to insert the tube inside the tire.
Before the tire is being replaced, it is better to refer to the manual & the components can be cleaned.
When inserting the front tire by including the speedometer & positioning the brake rotor into the brake pads. Hence, position the rotor of the brake caliper on the gap of the brake pads.
Finally, make sure that the axle nut is back on & tightening the clamp bolts. Remove the jack stand & center stand to move forward with the rear brake to straighten out the forks. Then to include the speedometer cable and to evaluate the front brake caliper
Conclusion
In conclusion, it is quite likely to remove or replace the front & rear tire except the important things to consider about brake, speedometer & it doesn’t affect the overall replacement of the tires. Secondly, it’s about being organized on the tools that are required & making sure that nuts or washers are not being misplaced
Furthermore, it is also important to refer to the manual especially to notice tiny details that would indirectly affect the overall process e.g.: lubricating the tire & wheels that help to ease out in replacing the tire.
Resources:

AR Jeet has been a tire mechanic for over 2years. He has worked on all types of vehicles, from cars and trucks to RVs and ATVs and motorcycles. He has seen it all when it comes to tires, and he knows how to fix them.
AR Jeet is a tire expert, and he is passionate about his work. He loves to help people keep their vehicles running smoothly, and he is always happy to answer any questions that people have about their tires.
If you need help with your tires, or if you just want to learn more about them, then AR Jeet is the man to talk to. He will be happy to help you out, and he will make sure that you get the best possible solution.
He has a blog [Tirespick.com] where he writes about all things tire-related, and he is always happy to help people with their tire needs. Know more about AR Jeet.